How to remove LED flickering in webcam

LED flickering in webcams can be a pesky issue, especially when you’re in the middle of an important video call or recording a video. The flickering is often caused by the mismatch between the frequency of the LED lights and the frame rate of the webcam. Fortunately, there are solutions to this problem for all major operating systems. Let’s dive in!

1. Linux:

  • Adjust the Frame Rate:
  • Open the terminal.
  • Use the v4l2-ctl tool to list the supported frame rates of your webcam: v4l2-ctl --list-formats-ext
  • Set the frame rate to match the frequency of your LED lights. For example, if your lights are at 50Hz, set the webcam to 25 or 50 fps.
  • v4l2-ctl --set-ctrl power_line_frequency=1
  • Use GUVCView:
    • Install GUVCView: sudo apt-get install guvcview
    • Launch the application and adjust the frame rate and exposure settings to reduce flickering.

2. Windows:

  • Update Webcam Drivers:
    • Go to Device Manager.
    • Locate your webcam under “Cameras” or “Imaging devices”.
    • Right-click and choose “Update driver”.
  • Adjust Webcam Settings:
    • Open the webcam software (e.g., Logitech Webcam Software).
    • Navigate to the settings or preferences.
    • Adjust the frame rate, exposure, and other settings to match the frequency of your LED lights.

3. macOS:

  • Use Webcam Settings App:
    • Download and install the “Webcam Settings” app from the Mac App Store.
    • Open the app and adjust the frame rate, exposure, and other settings to reduce flickering.
  • Reset SMC (System Management Controller):
    • If the flickering persists, it might be a power-related issue. Resetting the SMC can help.
    • For MacBooks with a non-removable battery: Shut down the MacBook. Press and hold the left Shift, Control, Option, and the power button for 10 seconds. Release and turn on the MacBook.
    • For MacBooks with a removable battery: Shut down the MacBook. Remove the battery. Press and hold the power button for 5 seconds. Reinsert the battery and turn on the MacBook.
Posted in Uncategorized | Leave a comment

How to generate core dump files

Description

Core dump files provide a snapshot of a system’s memory and process information, and are therefore useful when generated before a process crashes or otherwise exits abnormally. They are a useful aid in identifying bugs or other problems that led to a process crash.

In order to generate core dump files on your system, use the following instructions.

Linux and Mac OS X

1. When enabled, core dump files in Linux and Mac OS X are generated automatically before a process crashes. You can check whether core dump files are enabled with the following command:

ulimit -c

By default core dump files are disabled, in which case this command will return 0. To enable core dump files, use the following command:

ulimit -c unlimited

The unlimited argument refers to the core dump file size. By effectively removing a file size limit, we prevent the file from being truncated and from losing out on any useful information.

2. (Linux only step) Locate and open the following files in a text editor:

  • /etc/init.d/asperacentral
  • /etc/init.d/asperahttpd
  • /etc/init.d/asperanoded
  • /etc/init.d/asperawatchd

Find the DAEMON_COREFILE_LIMIT setting. If it is set to a limited value like 5000:

DAEMON_COREFILE_LIMIT=5000

Replace it with the following line:

DAEMON_COREFILE_LIMIT=unlimited

3. To test that your core dump files can be generated, send an abort signal to an Aspera process such as asperanoded. You can do so by looking up the process ID of asperanoded and then sending a kill signal, such as with the following commands:

pgrep asperanoded
kill -SIGQUIT process_ID

On Linux, the core dump file is generally found in the location defined by the core_pattern file, which can be viewed with the following command:

cat /proc/sys/kernel/core_pattern

If the file pipes output to another program (if there is a asperanoded in front), or if the core dump files are being saved to the directory of the process (which may not be writeable), you can change the location. For example, with the following command you can save core dump files to the tmp directory, with files named core_processName_processID:

sysctl -w kernel.core_pattern=/tmp/core_%e_%p

On Mac OS X, the core dump file is located at the following location, where X is the process ID of the process that crashed:

  • /cores/core.X

Windows

On Windows you will have to modify registry values in order to enable crash dump files. To do this use the following instructions.

1. Go to Start > Run, type regedit and click OK.

2. Expand the folders on the left to navigate to the following path:

  • HKEY_LOCAL_MACHINE\SOFTWARE\Microsoft\Windows\Windows Error Reporting

3. Locate the LocalDumps key in the path. If it doesn’t exist, go to Edit > New > Key and name it LocalDumps.

4. Go to Edit > New > String Value and name it DumpFolder. Right click DumpFolder, select Modify and set the value to %LOCALAPPDATA%\CrashDumps

5. Go to Edit > New > DWORD (32-bit) Value and name it DumpCount. Right click DumpCount, select Modify and set the value to 10 and the base to Decimal.

6. Go to Edit > New > DWORD (32-bit) Value and name it DumpType. Right click DumpType, select Modify and set the value to 2 and the base to Decimal.

7. Go to Edit > New > DWORD (32-bit) Value and name it CustomDumpFlags. Right click CustomDumpFlags, select Modifyand set the value to 0 and the base to Decimal.

8. Restart Windows.

Posted in Linux | Leave a comment

Electronic symbols

Symbol Name

Electronic symbol for a battery (one cell).

Battery (one cell). Negative on the left.

Electronic symbol for a battery.

Battery. Negative on the left.

Electronic symbol for an Earth ground.

Earth ground

Electronic symbol for a chassis ground.

Chassis ground

Electronic symbol for an signal ground.

Signal ground

Electronic symbol for a switch (SPST). Normally Open (NO).

Switch (Single Pole, Single Throw – SPST). Normally Open (NO).

Electronic symbol for a switch (SPST)

Switch (Single Pole, Single Throw – SPST). Normally Closed (NC).

Electronic symbol for a switch (SPDT)

Switch (Single Pole, Double Throw – SPDT).

Electronic symbol for a pushbutton switch

Pushbutton switch. Normally Open (NO)

Electronic symbol for a pushbutton switch

Pushbutton switch. Normally Closed (NC)

Electronic symbol for a resistor (IEEE standard)

Resistor (IEEE standard)

Electronic symbol for a resistor (IEC standard)

Resistor (IEC standard)

Electronic symbol for a potentiometer (IEEE standard)

Potentiometer (IEEE standard)

Electronic symbol for a potentiometer (IEC standard)

Potentiometer (IEC standard)

Electronic symbol for a photoresistor

Photoresistor/Light dependent resistor (LDR)

Electronic symbol for a photoresistor

Photoresistor/Light dependent resistor (LDR)

Electronic symbol for a capacitor (non-polarized)

Capacitor (non-polarized)

Electronic symbol for a variable capacitor

Variable capacitor

Electronic symbol for a polarized capacitor (e.g. electrolytic)

Capacitor (polarized, e.g. electrolytic)

Electronic symbol for a polarized capacitor (e.g. electrolytic)

Capacitor (polarized, e.g. electrolytic)

Electronic symbol for a diode

Diode

Electronic symbol for a zener diode

Zener diode

Electronic symbol for a Schottky diode

Schottky diode

Electronic symbol for an LED

LED (Light-Emitting Diode)

Electronic symbol for an NPN transistor

Transistor (NPN)

Electronic symbol for an NPN transistor

Transistor (NPN)

Electronic symbol for an PNP transistor

Transistor (PNP)

Electronic symbol for a PNP transistor

Transistor (PNP)

Electronic symbol for a MOSFET N-channel, enhancement-mode

MOSFET (N-channel, enhancement-mode)

Electronic symbol for a MOSFET P-channel, enhancement-mode

MOSFET (P-channel, enhancement-mode)

Electronic symbol for a MOSFET N-channel, enhancement-mode, no bulk

MOSFET (N-channel, enhancement-mode, no bulk)

Electronic symbol for a MOSFET P-channel, enhancement-mode, no bulk

MOSFET (P-channel, enhancement-mode, no bulk)

Electronic symbol for a MOSFET N-channel, enhancement-mode, no bulk

MOSFET (N-channel, enhancement-mode, no bulk)

Electronic symbol for a MOSFET P-channel, enhancement-mode, no bulk

MOSFET (P-channel, enhancement-mode, no bulk)

Electronic symbol for a MOSFET N-channel, depletion-mode

MOSFET (N-channel, depletion-mode)

Electronic symbol for a MOSFET P-channel, depletion-mode

MOSFET (P-channel, depletion-mode)

Electronic symbol for a SPST relay

Relay (Single Pole, Single Throw – SPST). Normally Open (NO).

Electronic symbol for a SPST relay

Relay (Single Pole, Single Throw SPST). Normally Closed (NC).

Electronic symbol for a SPDT relay

Relay (Single Pole, Double Throw – SPDT)

Electronic symbol for a fuse (IEEE/ANSI standard)

Fuse (IEEE/ANSI standard)

Electronic symbol for a fuse (IEEE/ANSI standard)

Fuse (IEEE/ANSI standard)

Electronic symbol for a fuse (IEEE/ANSI standard)

Fuse (IEEE/ANSI standard)

Electronic symbol for a fuse (IEC standard)

Fuse (IEC standard)

Electronic symbol for a voltmeter

Voltmeter

Electronic symbol for a ammeter

Ammeter

Electronic symbol for a ohmmeter

Ohmmeter

Electronic symbol for a wattmeter

Wattmeter

Electronic symbol for a jack socket, earphone connector

Jack socket/phone connector

Electronic symbol for a jack socket for audio

Jack socket/phone connector. Plug enters from the right.

Electronic symbol for a 6x1 pin header

Pin header 6×1

Electronic symbol for a 6x2 pin header

Pin header 6×2

Electronic symbol for speaker

Speaker
Posted in Uncategorized | Leave a comment

[LINUX]How to mount NAS network drive or folder in Raspberry pi

we could mount network share or folder or drive, on linux

  1.  Follow step to install  required software and mount NAS share
  2. Open a Terminal and install   CIFS utility as mentioned below,
  3. sudo apt-get install cifs-utils or
    sudo apt-get install smbfs (incase old distribution)
  4. Now edit /etc/fstab file to add mount partition.
  5.   sudo vi /etc/fstab
  6. following is example where “Videos” folder from NAS is mounted on linux with guest permission.  NOTE: it should be single-line
  7. //<IP_ADDRESS>/<DISC>/Media/Videos /media/Networkdrive cifs guest,uid=33,gid=33,iocharset=utf8 0 0
  8.  save and close file
  9. on terminal  "sudo mount -a"
  10. if there are no errors it will available as  “/media/Networkdrive
    “.
  11. After reboot this share will be available.


Posted in How to?, Linux, RaspberryPI, Uncategorized | Tagged , , , , , , , , | Leave a comment

How to add new layer in Yocto i.mx6

It is suggested to create a layer when creating or modifying any metadata file (recipe, configuration file or class). The main reason is simple: modularity. Follow these steps

1. To have access to Yocto scripts, setup the environment from the BASE folder

$ . setup-environment build

2. Move to the place you want to create your layer and choose a name (e.g. `my-custom`)

sources $ yocto-layer create my-custom

# Answer the questions. Make sure the priority is set correctly (higher numbers,

# higher priorities). Set the priority equal to the lowest already present, except

# when you have introduce a new recipe with the same name as other and want to shadow

# the original one.

3. Add any metadata content. Suggestion: Version the layer with Git and upload your local git repo to a server

4. Edit and add the layer to the `build/conf/bblayers.conf` file

5. To verify that your layer is *seen* by BitBake, run the following command under the build folder

build $ bitbake-layers show-layers

Posted in Uncategorized | Tagged , , , , , , | Leave a comment

[Linux] How to compile yocto BSP with external toolchain

Setup an external toolchain with Yocto

 You can use the sourcery g++ toolchain, but it requires custom tuning arguments to control selection of the multilib in the external toolchain sysroots, so you should switch to a separate layer and override the tuning files in question.

For example.

If you want to see an example of external toolchain stuff that works, see the meta-sourcery layer.

Watch this presentation about how to setup an external toolchain with oe-core.

  • Example with Linaro toolchain
#
# Setting the following variables will enable the use of the Linaro toolchain. If not set
#     you will build using gcc built by Yocto. EXTERNAL_TOOLCHAIN must be set to the path
#     where the linaro toolchain exists and should have subdirectories named lib, bin, etc
#

TCLIBC = "external-linaro-toolchain"
TCMODE = "external-linaro"
EXTERNAL_TOOLCHAIN = "/home/koan/altera-linux/linaro/gcc-linaro-arm-linux-gnueabihf-4.7-2012.11-20121123_linux"
Posted in How to?, Linux | Tagged , , , , , | Leave a comment

[Mac os X] How to use dd command on mac

Mac OS X

Command Line Interface

  1. Download the desired .img file
  2. Open a Terminal (in /Applications/Utilities/)
  3. Run diskutil list to get the current list of devices

  4. Insert your flash media
  5. Run diskutil list again and determine the device node assigned to your flash media (e.g. /dev/disk2)

  6. Run diskutil unmountDisk /dev/diskN (replace N with the disk number from the last command; in the previous example, N would be 2)

  7. Execute sudo dd if=/path/to/downloaded.img of=/dev/rdiskN bs=1m (replace /path/to/downloaded.img with the path where the image file is located; for example, ./ubuntu.img, /dev/rdiskN is faster than /dev/diskN). If you see the errordd: Invalid number `1m', you are using GNU dd. Use the same command but replace bs=1m with bs=1M.

  8. Run diskutil eject /dev/diskN and remove your flash media when the command completes

Posted in How to?, Linux, RaspberryPI | Tagged , , , , , , , , , | Leave a comment

[Qt] How to customise QSlider

QSlider with with rounded ends can be done only via stylesheet.

Additionally added subpage for qSlider to change color of slider.


slider-screen

QSlider::groove:horizontal {
border: 1px solid #999999;
height: 18px;

border-radius: 9px;
}

QSlider::handle:horizontal {
width: 18px;
 background-image: url(:/slider-knob.png)
}

QSlider::add-page:qlineargradient {
background: lightgrey;
border-top-right-radius: 9px;
border-bottom-right-radius: 9px;
border-top-left-radius: 0px;
border-bottom-left-radius: 0px;
}

QSlider::sub-page:qlineargradient {
background: blue;
border-top-right-radius: 0px;
border-bottom-right-radius: 0px;
border-top-left-radius: 9px;
border-bottom-left-radius: 9px;
}
Posted in Qt | Tagged , , , , | 7 Comments

[RaspberryPI] How to mount Network Drive with read write permissions

How to mount Network Drive in Beaglebone Raspberry PI

Add following line under /etc/rc.local and update with appropriate

sudo mount -t cifs -o user=,password=,sec=ntlm,rw,file_mode=0777,dir_mode=0777 //network-pc/dir-name /opt/media

that all. now reboot 🙂 now drive will be mounted to your given path (/opt/media)

Posted in Linux, RaspberryPI | Tagged , , , , , | Leave a comment

How to Watch Live Interrupts

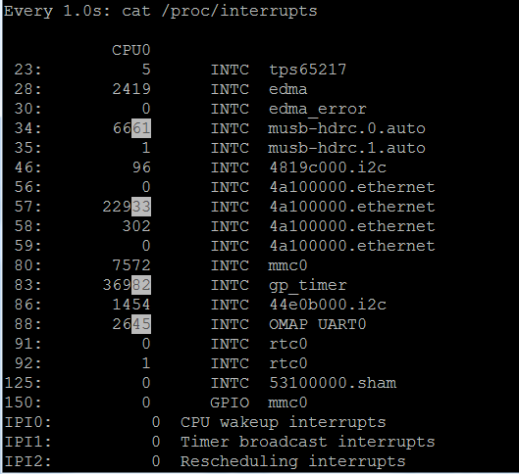
Watch Command useful to check timely update from shell.

Here is example to check in interrupts every one second

$ watch -d -n1 "cat /proc/interrupts"


Image


It shows interrupt count updated in highlighted 🙂 

Posted in Uncategorized | Tagged , , , | Leave a comment